about the banner…

Water lilies at the Brooklyn Botanical Garden Orchid Show, April 5, 2014. Taken with the Nikon D610 + AF-S Zoom NIKKOR 24-85mm f/3.5-4.5 G ED VR. 1/600 s @ f/5.6 -0.67, ISO 800.

Saturday, June 26, 2010

My New Olympus

Picked this up at a lawn sale today for $10.00...
Olympus OM-T 35mm SLR
At first I thought it might be broken, but it turns out it just needed a battery to cycle the shutter so the film advance would unlock.

My wife is an Olympus gal. She swears by them. She owns not only this camera, but the venerable OM-7t as well.

Like my original Canon AE-1, it’s a great camera to have in my collection. Unlike the Canon, it’s an aperture priority camera, and does not have a manual mode, hence the “manual adapter”. Just one of the little quirks of Olympus that makes them a unique camera brand. I definitely plan on shooting with this, but before I do, I may need to replace the seals and mirror damper. Then, I can determine whether or not it needs a full-blown CLA.

Not only did I get the body and the excellent 50mm f/1.8 F. Zuiko lens, but it also came with the manual adapter, and a Soligor 95-310mm f/5.6 zoom lens. Nothing to write home about, but fun to play with nonetheless. All in all, a nice find.


My Fourth Lens

For my fourth lens, I had given myself certain criteria; It had to complement my existing lenses; do something they didn’t do in terms of focal length or aperture. A fast prime lens perhaps, such as the AF-S NIKKOR 50mm f/1.4G, or the AF-S DX 35mm f/1.8G. Maybe something really wide, like the AF NIKKOR 20mm f/2.8D. Or a high power zoom, such as the AF-S VR NIKKOR 70-300mm f/4.5-5.6G IF-ED.

Thursday, June 17, 2010

Cokin’s Raison d'être…

I’ve just acquired a new reason for using Cokin filters: The P173, Varicolor Blue/Yellow Polarizer. If there’s any reason to own a Cokin filter holder, this would be it. This filter offers a unique advantage over just about any other optical or digital filter I have come across. And, unlike Cokin’s typical resin filters, this one is made of glass.

Tower Hamlets, London, England...

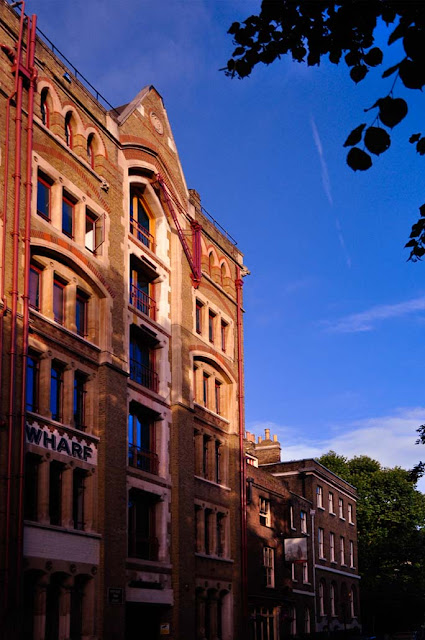
View along Wapping High Street
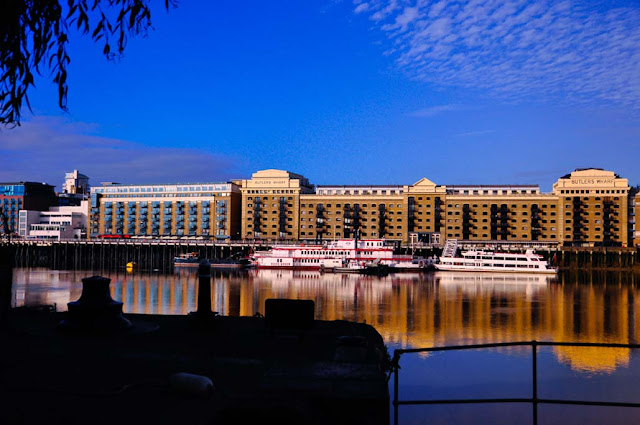
View along the Thames

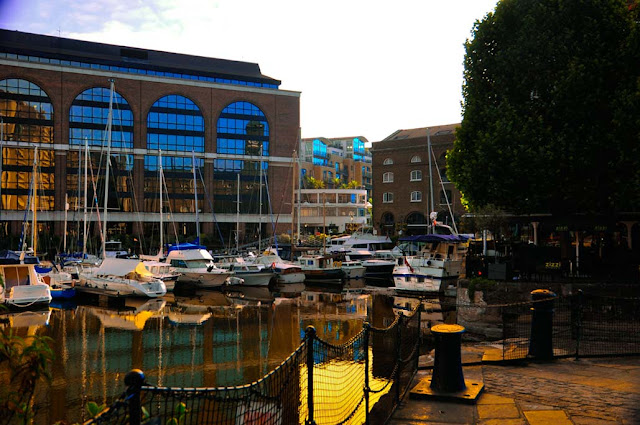
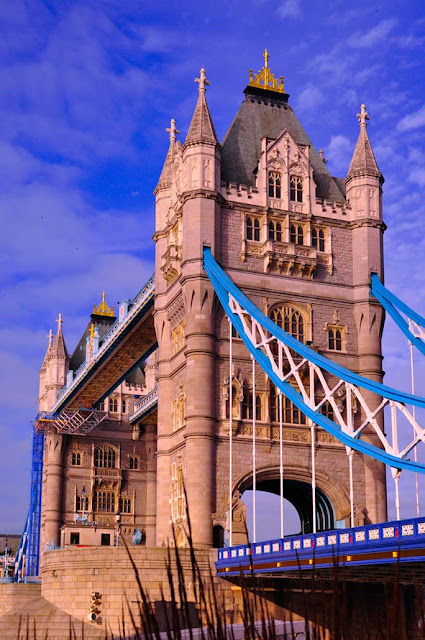
Inner Harbor facing East
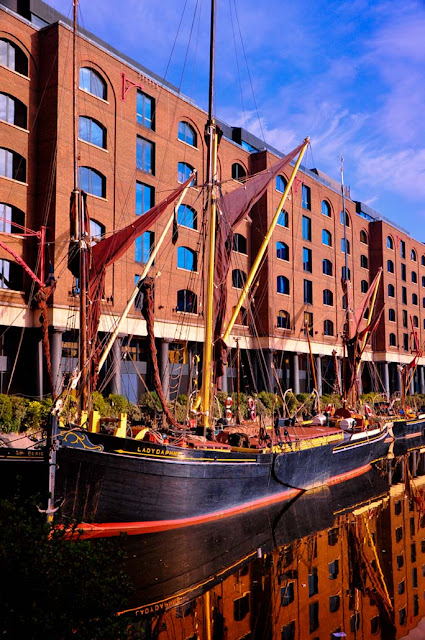
Inner Harbor, facing west
London Bridge
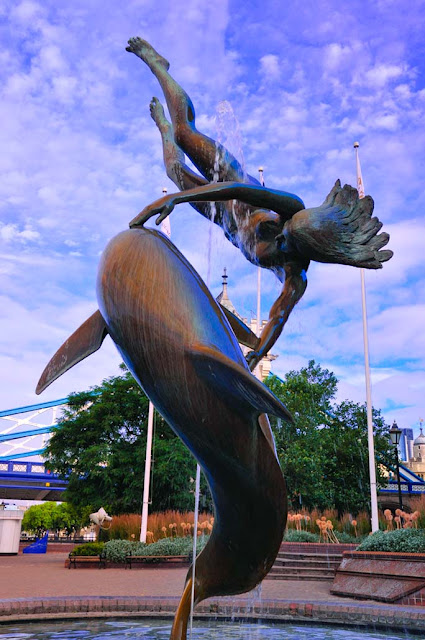
Statue along the Thames

As I’ve mentioned before, polarizers do things digital filters can’t, because they act upon the light before it’s captured by the camera. In the case of the Cokin P173, there are two polarizers at work; The first filters out the blues in one plane of light, and the second filters out the yellows in the plane of light that is 90° out of phase with the first. The result is the ability to selectively split these two planes of light into blues and yellows, two complementary colors which are particularly easy to work with. Simply put, you can intensify a blue sky while warming a building in the foreground.

The effect differs with the rotation of the filter, and its orientation with the light source, just like any other polarizer. A standard polarizer is most effective when pointed at a 90° angle to the light source, and the P173 is no different. However, regardless of the camera’s orientation with the main light source, individual items will take on a different color depending on their orientation with the light source. So the effect is more apparent than with a standard polarizer.

For example, in the photo of the Inner Harbor facing east above, you’ll notice that the sky is neutral. However, the sky’s reflection in the building’s windows (vertical plane) is blue, while the sky’s reflection in the water (horizontal plane) is yellow. In the case of the statue, the curved surfaces are no longer a single color, but divided into rich blues and warm browns.

The effects are somewhat unpredictable, and unique to every image, providing a vast venue for experimentation. There are many techniques to be learned in using this filter. Here are some of my initial observations:

There appears to be an optimal angle of rotation, in which the greatest separation of blues and yellows occur. When I find it, the image simply comes alive. In my opinion, this yields the most striking image, even if the overall color balance isn’t to my immediate liking.

When the filter is not acting upon different planes of light, it appears to have a somewhat pale mauve cast, not unlike the pinkish cast of a skylight filter, which imparts a somewhat magenta color cast.

There are several ways of neutralizing this cast. (1) You can white balance through the filter while using a diffuser to assure that the light does not come from any single plane. (2) You can balance normally and shoot in RAW, adjusting the white balance later on in post. (3) You can use the rotation of the filter itself to balance to neutral elements within the scene. (4) You can use auto white balance (something I normally never recommend, although in this case it can prove to be an advantage.)

Overexposure can quickly diminish the effects of this filter, so lean to the dark side.

The particular hue of the resulting blues and yellows may not be to your immediate liking. However, purple skies and yellow-green buildings can easily be fixed with the many selective color tools available.

The Cokin Varicolor series filters are also available in red/blue, red/green and pink/orange color combinations, although the blue/yellow seems to be the most popular and useful. I discovered this when I attempted to order it; it was backordered from Cokin, and I had to wait several weeks. However, it arrived just before my trip to England, and was well worth the wait.


Tuesday, June 15, 2010

Holga? What’s a Holga?

OK, I’ll admit it; deep down, I’m a camera snob. So, when I overheard a conversation by a colleague who mentioned that they couldn’t wait to take some pictures with their new “Holga”, some enlightenment was in order. And now, I can’t wait to take some pictures with my new Holga, which arrived today.


Holga 120 FN Plastic “Toy” Camera

Regardless of one’s professional status as a photographer, I don’t think the relevance of this “camera” can easily be dismissed. It’s fun. It’s quirky. It brings you down off your pedestal and gets you thinking again. Or, maybe not thinking, but just shooting. And wondering. Anticipating how the image will look. Not unlike pinhole photography, but with much shorter exposure times.


There are actually many flavors of this camera from which to choose. Some with built-in flash, some with a hot shoe (either or, unfortunately). There’s even a pinhole model, and a 35mm model. I chose this model because of it’s seemingly robust flash. There’s another flash model with three built-in color filters that I came close to choosing, but I wasn’t sure how effective it would be. The built-in flash appealed to me over the hot shoe, as traveling light seemed to be what this camera is all about.


I’m not at all put off by the quality of construction, which actually seems pretty good for what it is. I only wish I had known about this camera before I bought my daughter’s first film camera, which was a not just a toy camera, but a “kiddy camera”.


So, with this inexpensive camera, I’ve officially entered the world of true Lomography. And while I understand the concept, I fear the only way I will truly “get it” is once I start shooting with it.


You can learn more about the Holga and its cult following by visiting the Holga Microsite.


Day Lillies

Daylillies
Honestly, I don’t even remember taking this picture. It was most likely a test shot taken at the long end when I first got my 70-300mm f/4.5.

Sunday, June 6, 2010

What Digital Can’t Do, Part One: Redscale

From the moment I learned about redscale, I was intrigued by the simple ingenuity of using the film base itself as a filter by loading it into the camera with the emulsion facing backwards. With the appropriate subject matter, the aesthetic could be quite compelling, and it seemed a wonderful reason to continue shooting with film.

But curiosity got the better of me, and when I accidentally used a Cokin Orange #A002 filter, (which I usually reserve for adding contrast to black and white images) on a color image, I noticed a similarity. So now I’m on a quest to find a way to shoot redscale with a digital camera. And the orange filter gets me in the ballpark.

Digital image captured through an orange filter; first attempt at digital redscale.
The results vary widely depending on the white balance, exposure, and the camera’s contrast, hue, and saturation settings. So, with an orange filter installed, I can get many different effects. An incandescent white balance, somewhere at the low end around 3500K, yields a shapely, “colorful’ image comprised of browns, reds, oranges and yellow-greens. A white balance towards the high end of 6,000K, such as flash, yields a saturated, relatively monochromatic image comprised of reds, oranges and yellows. The results can be quite unpredictable, not unlike redscale film, but they can also be quite controllable as well. For example, I might shoot a cityscape at 2500K to get as much shape and color variation as possible, while a sunset would look spectacular at 5500K, where it would display an intensely saturated collection of reds, oranges and yellows.

The first thing I noticed about my attempt was that it was a lot brighter and a lot cleaner. Despite using an orange filter, the neutral highlights were yellow, just like rescale film. But I also learned that using active D-Lighting was a no-no. It lightened the shadows, and forced browns to become a bright, saturated, shapeless red. So there is much work ahead to perfect the technique.

Could I make the image look like redscale using Photoshop? Pretty much. I’ve already created an action to convert a regular image to “redscale” using the channel mixer. But I really want to try to get it as close as possible without any post processing.

Do I think it will ever faithfully reproduce the effect captured on redscale film? No. Can it capture the overall feeling of a redscale film image? Maybe. Is it worth pursuing as a creative form of digital photography? Definitely.

Will I continue to roll my own redscale and perfect the technique on film?
Absolutely. And here’s why…

   
Kodak Gold 200 rated at ISO 100, redscaled.

To be fair, these images are a bit underexposed despite rating the ISO 200 film at 100. Next time I think I’ll keep the same rating, but open up a stop. The digital image on the other hand used used active D-Lighting, so it’s not a good example either. But, I think there’s potential.

Incidently, the square format image was photographed with the Nikkor 16-85mm f3.5 (a DX lens) on the N80 body. As you can see, if you crop it for a square format, it removes the vignetting and works just fine. So, it makes a nice, super-wide lens for my Nikon film body. I could also have cropped it for a 16mm x 24mm frame size, which also would have eliminated the vignetting and given me a landscape format.


Tuesday, June 1, 2010