about the banner…

Water lilies at the Brooklyn Botanical Garden Orchid Show, April 5, 2014. Taken with the Nikon D610 + AF-S Zoom NIKKOR 24-85mm f/3.5-4.5 G ED VR. 1/600 s @ f/5.6 -0.67, ISO 800.

Tuesday, January 31, 2012

Panoramic Video for the iPhone 4S

The Kōgeto Dot is an ingenious lens attachment for the iPhone 4 and 4S which works in tandem with a dedicated app to create immersive 360° panoramic videos.

It draws no additional power from the camera, and the Looker app allows you to capture, view and share your panoramic videos by eMail, Facebook, Twitter or Dotspot, a dedicated panoramic video sharing website.

The unit clips to your iPhone, which you then hold flat (camera-side up) to allow the lens to capture the action in a 360° band. The app then converts the lens’ projection into the camera into a horizontal panorama, and allows you to view your own content, or that shared by others.


For more information on this exciting new product, visit the Kōgeto website.

Sunday, January 29, 2012

HDR Photography

HDR, or High Dynamic Range photography is a relatively old concept made more accessible through technology.

Given the limitations of film and sensors in capturing the enormous dynamic range of visible light that occurs in nature, it’s impossible to capture the subtle nuances of highlight and shadow detail in a single exposure.

A traditional in-camera workaround has been to use a graduated neutral density filter to reduce the exposure in the lighter areas, while allowing the full amount of light to enter the camera in the darker areas. This works fairly well if you’re photographing a landscape with a straight horizon or similar linear break between lights and darks. There are also spot-type filters with a darker neutral-density area in the center.

The first attempt at addressing the dynamic range issue in digital photography, either in camera or in post-processing, has been through the Shadow/Highlight filter, also known as:

  • ADL (Active Dynamic Lighting, Nikon)
  • iContrast (Canon)
  • Recovery/Fill Light (Adobe Camera Raw)
  • Shadow/Highlight, (Adobe Photoshop)

These cameras use algorithms which incorporate a high-pass filter to mask out the problem areas and restore detail by adjusting their brightness or darkness.

These methods however are all based on a single exposure. HDR photography is based on taking multiple exposures and combining them dynamically into a single image through the use of HDR software. However, this same concept can also be applied without the use of such software by bracketing exposures and combining them as fully masked layers in Photoshop, revealing the areas with the desired detail.


Saturday, January 28, 2012

The Rest of My Day…


Detail: Dorothy Hafner, Tango in the Garden, 2006

Detail: W. Cole Brigham, Charles Merrill Memorial Window, 1912

Detail: W. Cole Brigham, Charles Merrill Memorial Window, 1912


These are selected images from a visit to the Brooklyn Museum. They are all from the iPhone 4S, reduced from 3264 x 2448 px to 1600 x 1200 px.

I didn’t bring a camera with me on this outing, relying solely on the super-wide iPhone camera.

Museums can be a great venue for creative photography if one approaches it from the right perspective. Tight crops of two and three-dimensional artwork can yield beautiful images and avoid the inevitable reflections in glass cases. A black iPhone with a black case or bumper can help to camouflage itself, especially if held close to the glass.


Sunrise, Randolph, NJ


An early Saturday morning trip to the Randolph motor vehicle inspection facility yields a pleasant surprise.

Tile Mosaic, Penn Station, NY


Early morning commute on the 1, a few moments to kill between trains. A momento, a little piece of art, to take home. Processed in Adobe Camera Raw, the image was cropped and very slightly geometrically corrected.

Lighting in subway stations is harsh and unpredictable. In this case, it was mediocre, but the iPhone’s HDR capture mode helped to fill in the blown out specular highlight, and to even out the color. This made it easier to add vibrancy using the Saturation and Vibrance sliders. Very little exposure adjustment was needed as the iPhone did an excellent job in calculating the shutter speed.


Thursday, January 26, 2012

Available for Pre-Order: Canon G1 X

Canon G1 X: Greatly improved sensor in a modestly upgraded body.


The 2012 successor to the G12 will be the G1 X...

Thursday, January 19, 2012

Fujifilm X-S1: For SLR Lovers

Third in the Fujifilm X Series: The X-S1 Superzoom

The Fujifilm X-S1 is the third model in the X Series lineup, which is now the official designation for Fujifilm’s upscale cameras. It was officially announced just before the X-Pro1.

Tuesday, January 17, 2012

It’s Here…

Fujifilm’s new flagship; the X-Pro1 “Premium Interchangeable Lens Camera”


Finally, the digital equivalent of the classic rangefinder makes its debut…

Wednesday, January 11, 2012

Available for Pre-order: Lytro Lightfield Camera

The Lytro 16GB Light Field Camera
To be released in early 2012, the Lytro lightfield camera promises to revolutionize photography as we know it.

Tuesday, January 10, 2012

Nikon AF-S 85mm f/1.8G Available for Pre-Order

This new lens may be 2/3 stop slower than its f/1.4 cousin but it’s also $1,200.00 cheaper!

The new AF-S NIKKOR 85mm f/1.8G
Nikon continues its trend of updating the G series lenses with this economically-priced fast prime. 85mm is the classic portrait focal length in 35mm and full-frame digital format, and works well in the smaller APS-C format as well, where its focal length is equivalent to 127.5mm. As focal lengths get longer, compositionally the differences between full-frame (FX) and APS-C (DX) become less pronounced.

Saturday, January 7, 2012

900mm Moon

900mm Moon, 1/500 s @ f/11, ISO 200
Nikon D90 + Kenko TelePlus MC7 AF 2.0X DGX + AF-S NIKKOR 70-300mm f/4.5-5.6G ED
Yes, it’s sharpened. And cropped at 200%.

This morning a colleague of mine mentioned to me how big the moon was, and that he regretted not having his camera with him at the time. So, I remained vigilant. Sure enough, tonight it’s nice and clear;  a perfect opportunity to try out the Kenko MC7 on a moon shot.

It’s also pretty cold out, so I took this quickly, hand-held, with manual focus assisted by VR. If I had used a tripod, it would have been perhaps a little sharper. Compare it will my previous 450mm moon.

Previously taken with the NIKKOR 70-300mm zoom, cropped 400% and sharpened.

Basically this is a 200% optical enlargement over the previous version shown above. This is what the 900mm Moon looks like, unprocessed:

900mm Moon before post-processing.

My curiosity got the better of me, so I also tried it with the Phoenix/Samyang 500mm f/8 Catadioptric:

1500mm Moon, 1/200 s @ f/22, ISO 200.
Directly from the camera, no post-processing
This is a nice focal length to work with for moon shots. The contrast was pretty good as well. But it’s very soft, and with no VR it was very difficult to focus manually, even with the DR-6 Right Angle Viewfinder. Apparently, this catadioptric lens does not fair well in cold weather, because the longer I stayed outdoors, the softer the images became. This was the second image I took, and was handheld. I broke down and used a tripod for subsequent images, but they actually got worse. More testing is in order to see if the temperature was indeed a factor. But I can safely say the Phoenix Samyang is capable of better.

Friday, January 6, 2012

Intermediate Exposure Adjustments

Exposure, brightness, lightness, and luminosity all describe the same basic concept, how light or dark an image appears. However, in real-world application, they’re not the same.

Exposure takes place in the camera, and once it happens, it can never really be adjusted. That said, most post processing applications have an exposure adjustment to simulate the effects of exposure. Exposure is more or less “linear”; the more light you let into the camera, the whiter the whites will become until they “wash out” and all detail is lost. However, film also has response curve. Therefore, adjusting exposure is tricky in post processing.

Brightness refers not only to luminosity, but to color as well. An image is considered to “bright” when it’s both light and has clean, vibrant colors, in other words good color saturation. The luminosity level may be perfect, but if the colors do not have adequate saturation, the image will appear dull.

Lightness refers only to luminosity, hence the “Lightness” channel in the L*a*b* color space. When the color is right, we want to be able to control only the lightness, and this is not something that can be done by adjusting exposure.

Luminosity generally refers only to lightness, and not to color. The Luminosity blend mode in Photoshop restricts an adjustment to the information that would appear in the Lightness channel of a L*a*b* image. However, used descriptively it can also refer to brightness. A “luminous” image is one that is both light and colorful.


Curves
The advantage of Curves is that you can use them to adjust the brightness or lightness of values at up to fourteen points in a infinity number of locations along the tone curve, while preserving the white and black points. This makes it both an exposure and a contrast tool, which can be used to adjust both exposure and gamma.

Choose any point along the curve and drag up to brighten/lighten the image or down to subdue/darken the image in that particular tonal range without affect the white or black points. (If you’re in the Pigment/Ink mode the curve is moved in the opposite direction).

Wednesday, January 4, 2012

Intermediate Contrast Adjustments

Exposure does have an effect on contrast, but generally it’s governed by the lens, film and lighting.

Contrast can also be controlled through the chemistry, materials, techniques and algorithms used in  processing and printing. Digital images are processed either in the camera or the lightroom, so contrast adjustments can be made at the time of exposure or during post-processing. When you adjust the contrast in a digital camera, you’re altering how the raw image from the sensor is processed just before it’s saved to memory.

Contrast is the relationship between the light and dark tones of an image. The further apart these values, the more contrast or separation the image is said to have.

Vibrancy is an attribute of color that is also related to contrast. Images with more contrast are naturally more vibrant. Generally speaking, a lens with higher contrast will also render more vibrant color. However, digitally, we can control contrast without affecting vibrancy.


Curves
Undoubtedly the most powerful tool for adjusting contrast. As many as fourteen points can be placed on a curve, creating fifteen independent areas of contrast control. This control can be expanded to each of the image’s color channels as well. Knowing how to use curves properly can make or break an image. It’s easy to severely damage the tonal structure of an image by using complex curves, so they’re not for the faint of heart.

Contrast can be controlled independently of vibrance by using the Luminosity blend mode.

Vibrance can be controlled independently of contrast by using the Color blend mode.


Basic Contrast Adjustments

Exposure does have an effect on contrast, but generally it’s governed by the lens, film and lighting.

Contrast can also be controlled through the chemistry, materials, techniques and algorithms used in  processing and printing. Digital images are processed either in the camera or the lightroom, so contrast adjustments can be made at the time of exposure or during post-processing. When you adjust the contrast in a digital camera, you’re altering how the raw image from the sensor is processed just before it’s saved to memory.

Contrast is the relationship between the light and dark tones of an image. The further apart these values, the more contrast or separation the image is said to have.

Vibrancy is an attribute of color that is also related to contrast. Images with more contrast are naturally more vibrant. Generally speaking, a lens with higher contrast will also render more vibrant color. However, digitally, we can control contrast without affecting vibrancy.


Brightness/Contrast
Perhaps the simplest tool for adjusting contrast is the Brightness/Contrast panel. Unfortunately, it’s also the most misunderstood amongst professional color retouchers.

In earlier versions of Photoshop, B/C was strictly a linear adjustment, however, in recent versions it’s been changed to a gamma adjustment, with a check box to revert back to the “legacy” linear algorithm. Combined with the Luminosity mode and the Blend If sliders, this adjustment panel is an effective means of making basic contrast adjustments.

Dragging the contrast slider to the right lightens the quarter tones and darkens the three-quarter tones, increasing the contrast and vibrancy to an image with a normal distribution of tones. Conversely, dragging to the left decreases contrast and vibrancy. For lighter or darker images, the Brightness slider can be used to vary the “center” of the adjustment, similar to a “parametric” equalizer. This then compensates for high-key or low-key images, and the primary reason these two closely-related adjustments appear in the same panel.

Contrast can be controlled independently of vibrance by using the Luminosity blend mode.

Vibrance can be controlled independently of contrast by using the Color blend mode. When used this way, the Brightness and Contrast sliders each have a different effect on color saturation, without affecting lightness.


Basic Exposure Adjustments

Exposure, brightness, lightness, and luminosity all describe the same basic concept, how light or dark an image appears. However, in real-world application, they’re not the same.

Exposure takes place in the camera, and once it happens, it can never really be adjusted. That said, most post processing applications have an exposure adjustment to simulate the effects of exposure. Exposure is more or less “linear”; the more light you let into the camera, the whiter the whites will become until they “wash out” and all detail is lost. However, film also has response curve. Therefore, adjusting exposure is tricky in post processing.

Brightness refers not only to luminosity, but to color as well. An image is considered to “bright” when it’s both light and has clean, vibrant colors, in other words good color saturation. The luminosity level may be perfect, but if the colors do not have adequate saturation, the image will appear dull.

Lightness refers only to luminosity, hence the “Lightness” channel in the L*a*b* color space. When the color is right, we want to be able to control only the lightness, and this is not something that can be done by adjusting exposure.

Luminosity generally refers only to lightness, and not to color. The Luminosity blend mode in Photoshop restricts an adjustment to the information that would appear in the Lightness channel of a L*a*b* image. However, used descriptively it can also refer to brightness. A “luminous” image is one that is both light and colorful.

So while this tutorial is named “Basic Exposure Adjustments” we will also talk about adjusting the brightness, lightness and gamma of an image.


Brightness/Contrast
Perhaps the simplest and most powerful tool for adjusting exposure is the Brightness/Contrast panel. Unfortunately, it’s also the most misunderstood amongst professional color retouchers.

In earlier versions of Photoshop, B/C was strictly a linear adjustment, much like adjusting exposure in a camera. However, in recent versions, this has been changed to a gamma adjustment, with a check box to revert back to the “legacy” linear algorithm. This combined with the fact that we can use it with the Luminosity mode and the Blend If sliders makes it much more powerful that it initially appears.

Drag the Brightness slider to the right to brighten or lighten the image or to the left to subdue or darken the image. The Contrast slider makes the adjustment behave similar to Curves, and is discussed in Intermediate Contrast Adjustments.

Keep in mind that color saturation is naturally dependent on luminosity, so beyond a certain point, colors may appear washed out. If this occurs, use the Luminosity mode to regain vibrance.

Exposure or “brightness” of the image, can be adjusted with Brightness/Contrast by checking the “Legacy” box. This will create a linear adjustment that shifts all the values in the image toward the highlights. When doing this, we have to be sure not to shift them so far that the highlights wash out. Once we reach that point, we can go no further.

Midtone Gamma is adjusted when the exposure is correct (the highlights of the image are matched to the “white point” of the color space) but the image needs to be lightened or brightened. To adjust the gamma, be sure to uncheck the “Legacy” box. If you want only to lighten the image, and not brighten it (affect color), then use it with the Luminosity blend mode. If you are adjusting a CMYK image, the Luminosity mode must usually always be used in order to maintain color balance.

Lightness can be adjusted by using the Luminosity blend mode with the Legacy box unchecked (gamma adjustment) or checked (linear adjustment).

Brightness can be adjusted (gamma or linear) by using the Normal blend mode. For stronger brightness adjustment with more control over hue, saturation and contrast see Advanced Exposure Adjustments.


Levels
If you need to set the white and black points (“endpoints”) of an image, Levels can be used to adjust brightness or lightness at the same time. Drag the midtone gamma slider (gray) to the left to increase the gamma (lighten the image) or to the right to decrease the gamma (darken the image). Levels can be used with the Normal or Luminosity modes, but CMYK image almost always require Luminosity to maintain correct color balance.


Exposure
The exposure sliders found in Adobe Camera Raw, Adobe Lightroom and Apple Aperture all use algorithms specifically designed to simulate the effects of exposure adjustment within the camera. They are calibrated in stops rather than arbitrary numbers, and are fairly accurate, although their effects will vary widely between applications. They are arguably the best means of adjusting exposure.

Tuesday, January 3, 2012

Advanced Exposure Adjustments

Through the application of blend modes, advanced techniques can be used to make exposure adjustments with better control over color and contrast.

Applying a blend mode to an unmodified adjustment layer is the same as applying it to a merged pixel layer, except that it takes up far less disk space. In effect, this uses the image’s own pixel values to modify themselves, rather than using the defined amounts of the adjustment layers themselves. By using a Hue/Saturation layer as the basis of these adjustments, we can also achieve subtle control over the color balance, saturation and contrast of the exposure adjustment.

Lightening with Screen Mode
The Screen mode uses the pixel values in the layer to which it is applied to lighten those in the layers beneath. The effect becomes progressively stronger as the tonal values become darker. This makes it ideal for opening dark detail in heavy, “low key” images.
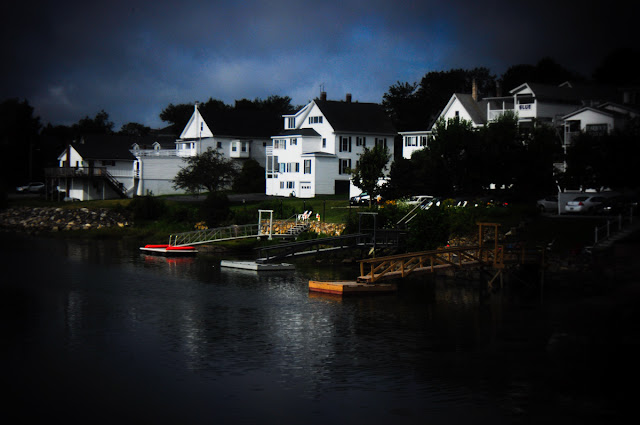
Boothay Harbor, ME
Holga HL-N 60mm f/8; (90mm), 1/250 s @ f/8.0, ISO 200
This image was taken with the Holga HL-N 60mm f/8 on a Nikon D90. A characteristic of this lens is dark, saturated, contrasty images with vignetted corners…just like the Holga 120 film camera. There’s much detail waiting to be revealed in the shadows, but we don’t want to use the usual vignetting remedy in Camera Raw or Photoshop, as this would only diminish the Holga effect. This image is perfect example of how Screen can be used to lighten a low key image.

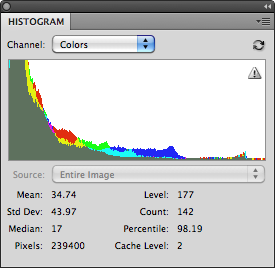
An image is low key when its histogram looks like the one to the right. The tonal information is lumped toward the dark (shadow) end of the histogram. The problem is, we need to open up the shadow detail, but we also need to maintain control over the contrast. Both of these goals can be accomplished with this adjustment technique, which favors the darker values of the image.

1. From the menu bar, choose Layer > New Adjustment Layer > Hue/Saturation.


2. In the New Layer dialog, select Screen from the Mode menu, and set the layer opacity to a nominal level, such as 25%; rename the layer “screen” if desired; click OK.
3. Adjust the layer opacity slider for the desired effect. On an extremely dark image such as this one, it’s not uncommon to bring the opacity up to 100%.


4. Already we can see detail emerging from the shadows, but we’d like a little more. Note that the highlights, although lighter, have not washed out completely…an advantage of using Screen. A powerful feature of using Hue/Saturation as a base layer is the ability to lighten the effect beginning with the shadow end of the histogram. To do this, we move the slider to the right…


We’re not going to go crazy, just 5% or so to give us an edge. We now have lots of room to work with, but we need to re-establish the contrast.


6. To do this, we use a most powerful yet little documented feature of Photoshop; The “Blend If” slider. These sliders let you “filter out” the results of the adjustment layer based on the gray values of either the current or underlying layer. You can also filter by the values of the individual channels, depending on the color mode. We can access this through the Layer menu…


This is one of the most important dialogs in Photoshop. It’s one-stop shopping that allows you to modify many aspects of the adjustment layer including its blend mode.
We’re going to use the “Underlying Layer” slider to restore the original contrast exactly where we need it. To do this, hold down the option key to “split” the shadow slider and move one half of it to the right until the contrast is the shadows is most pleasing. Here the value has been set to 15. This creates a “ramp” to the threshold point which smooths the transition.


We now have lots of shadow detail and contrast. Had we not split the slider, the effect would have been very abrupt…


This shows the exact point at which the effect begins to be filtered out. We can also use this to our advantage to see exactly where the change is taking place, and then split the slider to make the adjustment. The choice is yours which approach you prefer.

Although the highlights are not technically washed out, they are very bright. If desired, we can also do a little “recovery” adjustment to smooth out the highlights…


Note that this adjustment kicks in at 127. This is an important number, as it represents the midtone point in an 8-bit image file, which has 255 levels of gray. This means that any lightening of the highlights caused by this adjustment layer will begin in the midtones and gradually fade out to zero at the “white” point or “start“ point.

7. Now through all of this, the color may have suffered just a bit. Let’s bring up the saturation…


With “Master” selected, move the Saturation slider to the right. Next, we’ll take a little magenta down in the sky…


Sky generally falls in the cyan region, but in this image blues are most effective. Select the blues, and drag the Hue slider to the left. Finally, let’s clean up the grass…


Grass usually falls in the yellows, so we’ll select them and drag the Hue slider to the right to take down the magenta. Moving the Saturation slider to the right will clean them up a little further. And the end result…


from the original…


Because we can control the tonal range the adjustment is applied to with the Blend If sliders, this technique can also be used for a variety of other challenging situations…
  • General “brightening“ (lightening with added saturation).
  • Brightening already fully saturated colors.
  • Reducing contrast.
  • As the basis of a “Dodge layer.


Darkening with Multiply
Like Screen, the multiply mode uses the pixel values in the layer to which it is applied to darken those in the layers beneath. The effect becomes progressively stronger as the tonal values become darker. This makes it ideal for adding shape and definition to thin, “high key” images.

Monhegan Island, Maine.
Voigtländer Color Skopar 20mm f/3.5 SL II; 30mm, 1/1250 s -0.67 @ f/5.6, ISO 200.
This image was taken with the super-sharp Voigtländer Color Skopar 20mm. It’s not a particularly troublesome image, but it suffers from some washed-out colors. The greens in particular, which are the main attraction of this image, could be richer. and the sky seem to be a little thin.

It’s difficult to identify this as a high-key image from its histogram, but you can clearly see the majority of the color activity concentrated at the right, or highlight end of the tonal spectrum.

uses the pixel values in the current layer to darken those in the layers beneath, with the effect becoming progressively stronger as the tonal values become darker. This makes it ideal for adding weight and definition to thin, flat, “high key” images.


1. From the menu bar, choose Layer > New Adjustment Layer > Hue/Saturation.

2. In the New Layer dialog, select Multiply from the Mode menu, and set the layer opacity to a nominal level. This time, I’m going to go straight to one of my “magic numbers’, 35%. Rename the layer “Multiply” if desired.
Right off the bat, I like the result…


3. But, what this image didn’t suffer from was a lack of contrast, and this has added more, We need that contrast in the lights, but not in the darks, so, we’ll adjust the Shadow “Blend If” slider accordingly…

Again, I go directly to that 127 point, the midtones. Now I can see that the sky is comprised of both clouds and blue sky, and through the theory of simultaneous contrast lightening the clouds should make the blues look richer. So I adjust the contrast in the lights with the highlight end of the “Blend If” slider…

What this means is that the adjustments we’re making are taking place between 127 (the mids) and 200 (the three quarter tones). It’s easy to convert 0-255 values to 0-100 values by divide one number by the other (200/255=.78). And the result…


4. Much better. But there’s still something missing. The luminosity looks good, but the image still needs to be brighter. We’ve seen what happens when it’s lighter, so we know that’s not the solution. Lightness and Brightness are not necessarily the same thing. You can lighten an image up to a point, but beyond that point the colors begin to shift towards white, which is neutral color.

Normally, this would require a separate layer to restore the intensity of the colors, but we can do it all in the same layer with the Saturation slider…


And the result…


from the original…


Normally, 50% is a pretty big adjustment for saturation. But the layer’s opacity is 35%, so we have plenty of headroom. If you wish to clean the colors without adding a lot of additional luminosity, you might keep the opacity low, and the saturation very high, perhaps 85%.

When used with the “Blend If“ sliders, Multiply is also great for…

  • Recovering Highlights
  • Adding contrast
  • Adding richness to colors
  • As the basis of a “Burn Layer.


Exposure
This is a complex tool that’s designed for use with 32-bit HDR images, but works to some degree with 8-bit images as well. It behaves in a linear fashion like exposure within the camera, and is calibrated in f-stops, although its effects on highlights is severe. It also includes sliders for Offset and Gamma Correction to fine-tune HDR images. This advanced tool will be discussed further in a future tutorial on HDR Imaging.